
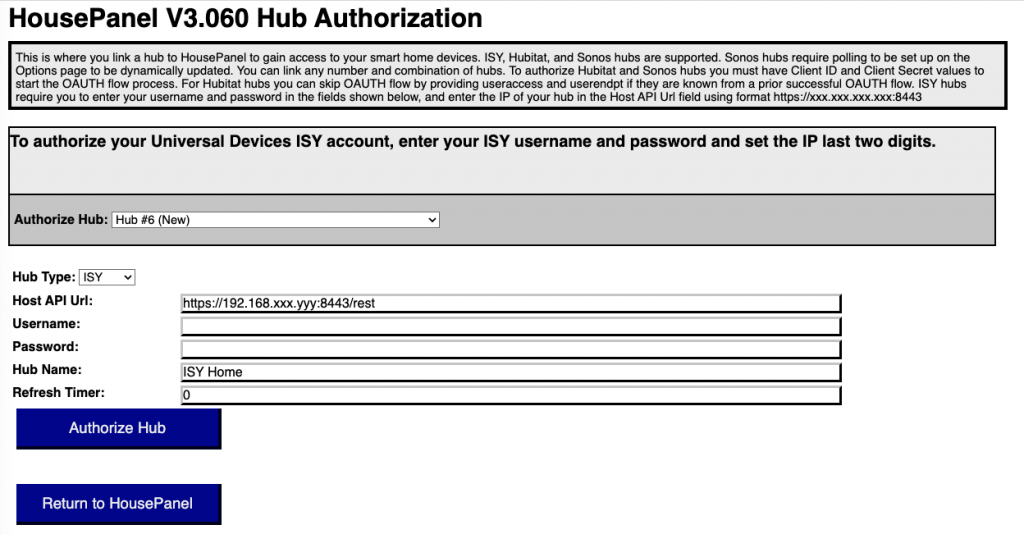
To view and control things on your panel, you must authenticate your smart hub. Multiple hubs are supported. To open the authentication page, select “HubAuth” from the main menu, or press the “H” key. If you have a controller tile on your panel, you can also select “Re-Auth” from the list of options. The HousePanel authentication page will be displayed where you provide hub credential information. If you are adding a new hub, the page will look as follows:
If you are updating an existing hub, you will pick an existing hub from the first dropdown list and then the page will look as follows:
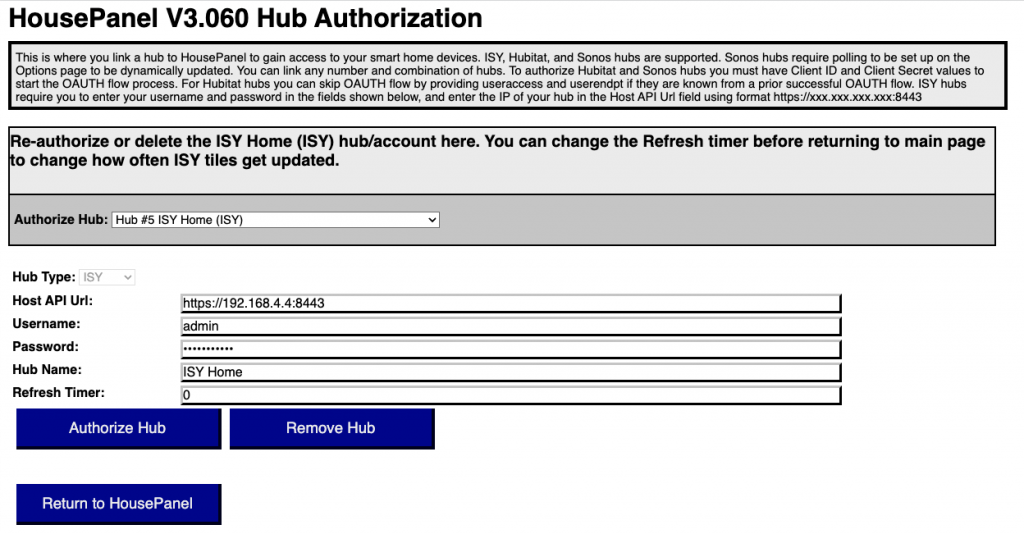
Note that the IP address must be provided for ISY hubs, and the full URL must be provided for Hubitat hubs. For Hubitat this can be the local IP based URL or the cloud based URL. Both are revealed in the log screen when the HousePanel.groovy app is added and configured.
Authorize Hub
All hubs currently authorized will be included in this drop down list. If this is your first time authorizing a hub, the list only have the default null hub listed and a placeholder for a new hub. Select the placeholder to add a new hub. If you have existing hubs, they may be selected to update or re-authenticate an existing one. The drop-down list is used to select which hub to authenticate.
HousePanel Authentication Input Fields
Hub Type
Three hub types are available:
- Hubitat
- ISY (Universal Devices)
- Sonos
The appropriate values to enter for the following parameters will depend upon which hub type you are authorizing.
Host API Url
This is the IP address or URL used to authorize your hub. For Hubitat this is either the IP of your local hub or the oauth cloud site noted below. For ISY hubs this is the local IP of your ISY hub.
Hubitat Local: http://191.168.1.50
Hubitat Cloud: https://oauth.cloud.hubitat.com
ISY: https://192.168.4.4:8443
Sonos: https://api.sonos.com
The IP addresses above are examples only. You will need to provide your actual IP address. If you want to be able to use your panel anywhere use the cloud version.
Client ID and Client Secret
These two parameters are unique to your hub and must be provided for Hubitat hubs. They are created when you installed HousePanel.groovy and activated OAUTH2 on your hub. During the installation step you were instructed to save these values for later use. This is where they are used. Please refer to the Installation Section for details. For ISY hubs, the Client ID is your username, and Client Secret is your login password. Note that ISY hubs do not use OAUTH2. Alternatively, these parameters can be skipped if you use the fixed Access Token and Fixed Endpoint options described next.
Fixed Access Token and Fixed Endpoint
The Fixed Access Token and Fixed Endpoint values are optional. If provided you do not have to provide the Client ID and Client Secret values. You also will not be redirected to an auth challenge page. This option is provided for those who know their tokens and don’t want to bother being challenged every time to enter their credentials when doing a hub reauthorization. These values are printed in the log file of your hub whenever HousePanel.groovy is saved.
Hub Name
The Hub Name field is optional and will be filled in automatically if left blank. If you provide a name here that name will be used instead of the name provided by your hub.
Refresh Timer
The final parameter, Refresh Timer, is the number of milliseconds to wait before all data is refreshed by reading the hub. A good value to use here is 300000 which is every 5 minutes . Smaller values will refresh the page more frequently. Values smaller than 60000 are not recommended because frequent hub refreshes can make your dashboard unresponsive. Refreshes can be disabled completely by setting this value to 0. This is a reasonable approach for most installations since HousePanel now automatically keeps all hubs in sync with the panel. This works particularly well with ISY hubs which use WebSockets to connect the HousePanel server with the ISY hub. SmartThings and Hubitat also work reasonably well by using subscriptions and HubAction calls from HousePanel.groovy; however, sometimes they can get out of sync so an occasional resync using a value here is a good idea. Again, 300000 (once every 5 minutes) is a good value to use.
HousePanel Authentication Buttons
Authorize Hub
When all required fields are provided, click this button to start the HousePanel authorization process. For Hubitat hubs you will be shown a list of your hubs. Select which hub you want to associate with HP. Most people only have 1 hub so there isn’t any decision to make here, but you will still need to explicitly click on the one hub that you have. After you click on the hub, all supported things will be shown in a list. Select which things you want HousePanel to have the option of displaying and controlling. I am saying the “option of” because HP does not have to display everything you select here. It is just that ONLY the things selected here will be possible to display. Selecting items actually displayed will be described in other sections.
You do not have the option of selecting items for ISY hubs. All nodes known to the ISY hub will be linked into HousePanel automatically and given a default name.
For Hubitat hubs, I recommend selecting everything that is supported in the most intuitive category. For example, dimmer switches will show up on both the switch list and the dimmer list. I would select it only on the dimmer list, but you can do both. You might decide to exclude some devices. For instance, I excluded a light that I have in my food pantry that is activated by a door open sensor, since I don’t anticipate ever needing to turn the lights on in a closed food pantry remotely. Anyway, just select the things you want and you will be good to go. To finish this step click on the Save button at the bottom of the screen.
After you finish selecting your devices you will be redirected back to this same Authentication page where the number of devices read will be shown for the hub you selected. At this point you can authorize another hub following the same procedure. Just select the hub you want from the “Authorize Hub” drop down list and proceed accordingly. If you want to add a hub then select the last item which is always a new blank hub.
Removing a Hub
Hub removal is currently not supported in the GUI. Hubs can be removed by editing the “hmoptions.cfg” file manually. The layout of this file is in standard “json” format. The config.hubs section contains an array of all authorized hubs. To remove a hub, remove it from this array. You will need to restart the server for the hub removal to take effect. If a hub is removed then all tiles associated with that hub will stop working.
Return to Housepanel
When you are done authorizing hubs, click on the large button “Return to HousePanel” at the bottom of the screen. Your selections will be processed and the main HousePanel page will display. When HousePanel loads after authorizing a new hub, it reads all things that you selected and their states. It then assigns unique ID numbers to each thing and saves that information in the HousePanel database. None of the things you authorized will be automatically added to your panel. You must do that yourself using the Edit or Options features described later.
HousePanel Authentication Security Considerations
The authentication step prevents anyone from accessing your HousePanel installation. This is why it is important to protect this login information; otherwise, anyone who has it will also be able to access your HousePanel and control your smart home. However, because HousePanel is typically installed on a Raspberry Pi on your home local network, only people with access to your home network will have access to HousePanel if you use local IP settings. This gives you an inherent extra layer of protection.