Tile Customizer
The tile customizer is a signature feature of HousePanel that gives the user the ability to add custom content to any tile. Custom content can include user provided text, images, videos, or content from the web. Users can even add fields from other devices to the tile being customized. The customizer is where users can specify Rules for automating their homes. Finally, users can define Lists in the customizer that will capture a historical record of a device’s state and display it in a graph and a table. No other Dashboard has a feature as cool as this, so I encourage you to spend time here understanding how this works so you can make full use of it’s amazing features to create the dashboard of your dreams. All fields added by the customizer are subsequently available to the Tile Editor so they can be styled. By default, RULE fields are hidden so they will need to be unhidden using the Tile Editor if you want to invoke the rules manually or show them for some reason. They are hidden by default because RULE’s run on their own without user intervention. To use the customizer, go into “Edit” mode by pressing the “E” key or clicking on the round “E” icon in the upper right corner. Next click on the blue dot with a number inside of it. This will open the Tile Customizer for that tile. The Tile Customizer screen looks as follows:
The Custom Type option in the upper left is used to pick what type of customization you are performing. Eight options are available: TEXT, POST, GET, PUT, URL, LINK, LIST, and RULE.
TEXT Types
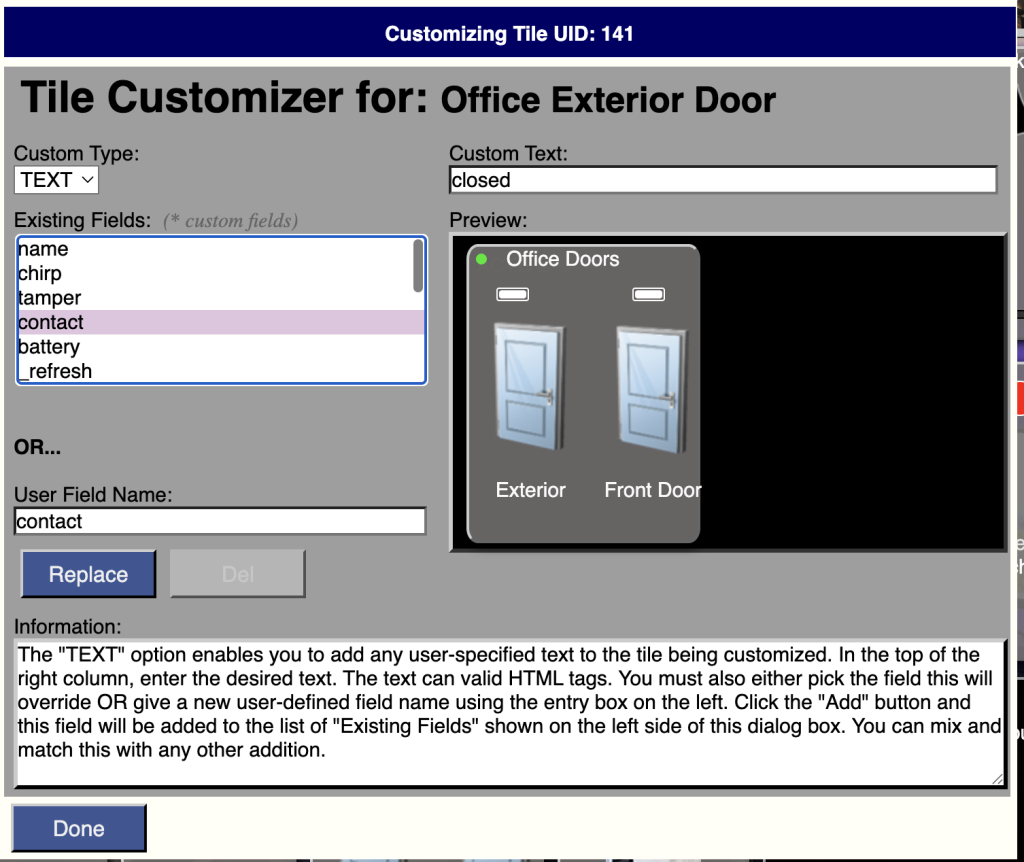
TEXT custom fields add user-defined text to a tile. You must enter a unique name of the field in the box underneath “User Field Name”. If you use an existing field name the user text you provide will overwrite that field’s value from your hub. This is useful in some situations such as overriding a device’s name with your own name, but in most cases you will want to give a unique field name for your user provided text field. When adding anything to a tile, you must first name the field in the User Field Name area on the left. You can also select an existing field, in which case your custom entry will replace the default behavior of that field on this tile. Be careful with this feature because it can remove important functionality. Then again, this flexibility means you can make all sorts of creative effects. For example, you can use this to intentionally disable a particular command by replacing it with some user-defined text. After providing your field name, enter your custom text in the upper right input box underneath the label “Custom Text”, then press the “Add” button. The button says “Replace” in the image above because the screenshot was taken when the field name matched an existing field. When you provide a unique field name, that button will change to say “Add”. Some field names do special things, including “password”, “allon”, “alloff”, and “readonly” as described in the following sub-sections.
password
TEXT custom fields can be used to add a password to any tile. To do this create a new TEXT field named password, all lowercase. Then enter the password in the text box in the upper right. Click “Add” and the password will be converted to a hash. This hash is the value stored in the TEXT field. Password fields are always hidden. When this custom field is present in a tile, when that tile is clicked, the password must be given for the action to be performed.
allon and alloff
If a field is created with the name “allon” or “alloff” then clicking on the field will cause all switches on the page to turn on or off. Be careful using this because anything with a field named “switch” will be turned on, including audio tiles.
readonly
If a field is given with the name “readonly” (all lowercase) then the entire tile will be treated as a display-only tile, and any attempt to click on an otherwise actionable field will do nothing other than display the tile status. The value specified in the Custom Text box can be anything but something like “true” or “readonly” is recommended. This field is also hidden by default.
POST, PUT, and GET
POST, PUT, and GET types are used to add a user-specified web service to the tile being customized using the method selected. The URL of the web service is provided in the upper right input field. You must also either pick the field this will override OR give a new user-defined field name using the entry box on the left. Click the “Add” button and this field will be added to the list of “Existing Fields” shown on the left side of this dialog box. This feature can be used to invoke commands from services such as EventGhost or the Hubitat Maker API. PUT calls do not return a value. Its field content will always be displayed as PUT::fieldname, where fieldname is the name of the custom field provided. POST and GET calls can return either plain text or a JSON object. If text is returned that text will be displayed as the field’s content. If an object is returned, the object fields are scanned for a field matching the name of an existing fields on the tile. If a match is found, that key’s value replaces the value of that field in the tile. If no fields match the key, a key named “value” is attempted and if found it will be used. If that fails then the returned object will be ignored and the default placeholder of “GET::field” or “POST::field” will be used as the custom field content. Note that all fields in the tile (except id), including custom TEXT fields, that match a key in the returned object will be replaced by the web call’s returned value. For example, let’s say you have a custom GET with field name “mycall”that returns JSON object: {flow: 67.4, pressure: 23.8}. You can show the flow and pressure values on your tile by adding a “flow” and “pressure” custom TEXT fields. If you want to avoid showing a GET::mycall field, you would make the custom GET with field name “flow” and only add a “pressure” custom TEXT field.
URL
URL custom fields will open the specified URL in a separate window when the field is clicked. The text entered must begin with http for this to work. The custom field will display as URL::fieldname, just like PUT is displayed as noted above. The best way to make web call custom fields look better is to hide their text in the Tile Editor and add an icon that reflects what the web call is doing. For example, I’ve used URL custom fields to add a field to open the Spotify website on my dashboard. I uploaded a Spotify icon to my User Media folder and selected that icon in the Tile Editor for my custom URL field.
LINK
LINK enable you to add any other field from any other tile in your smart home to the tile being customized. This will be a virtual link in that the state will stay in sync with the original. The customize page will look different in this mode:
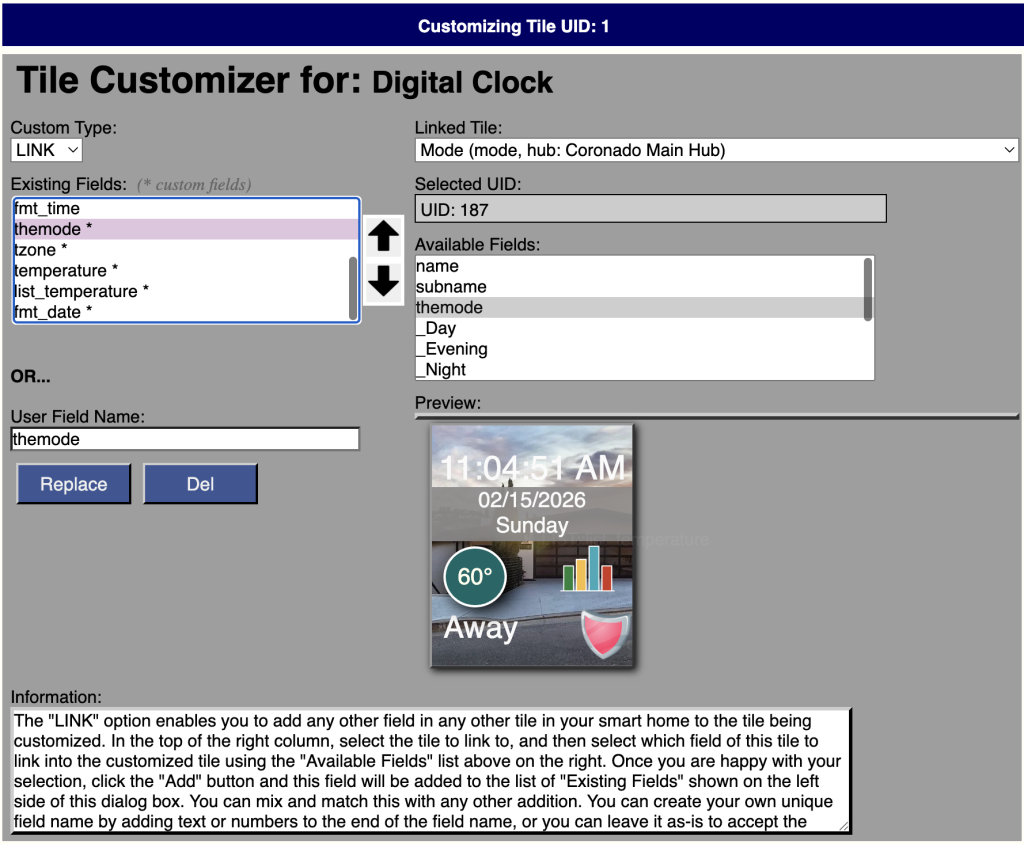
In the top of the right column, select the tile to link to, and then select which field of this tile to link into the customized tile using the “Available Fields” list above on the right. Once you are happy with your selection, click the “Add” button and this field will be added to the list of “Existing Fields” shown on the left side of this dialog box. You can mix and match this with any other addition. In the above example I added my Home Mode and the outside Temperature from a sensor I have on my balcony to the digital clock tile. This tile also shows a bar chart icon where I added a LIST field that will be described in the next sub-section. You may have noticed that I also used the LINK feature in first screenshot above where I added the Front Door to my Office Door tile. These links show why this feature is so powerful and useful, where it is more efficient to show these states on a single tile than show each separate tile that takes up precious space on a dashboard.
Note that with LINK customizations the field name must be taken from the linked tile. If you link in a \ field from another tile that has the same name as an existing field, an integer will be appended onto the field name. For example, when I added the contact from my Front Door to my Office Door tile, that custom fieldname became “contact2”. If I had added a 3rd door that field would have been named “contact3” and so on. You can alter the name to be anything, but you should leave the base name and only add letters and numbers to it. Changing the base name will prevent HousePanel from keeping your linked fields in sync with their parent device.
LIST
List custom fields are used to capture a historical record of the values of a field to display in table and graphical format when clicked. For example, you can use this to show a graph of the temperature as a function of time. A particularly useful application of this feature is to show the history of a variable value. Imagine you have a variable to keep track of a particular fact or state. Every time you change that variable a new value will be pushed to HousePanel so the LIST feature could be used to capture that new value in a table and display a graph of historical values over time. The LIST customizer screen looks similar to the LINK screen, where you first select which tile you want to track and then the field in that tile to track. After selecting the tile and field, you then pick how often to reset the history, either hourly, daily, weekly, monthy, yearly, when mode changes, or never. Like other customizations a unique field name must be given in the lower left input field. The default field name of list_xxx where xxx is the field being tracked can be used or any other unique name provided. On your main dashboard page, when you click on that field name, a table and a graph will be displayed that looks as follows.
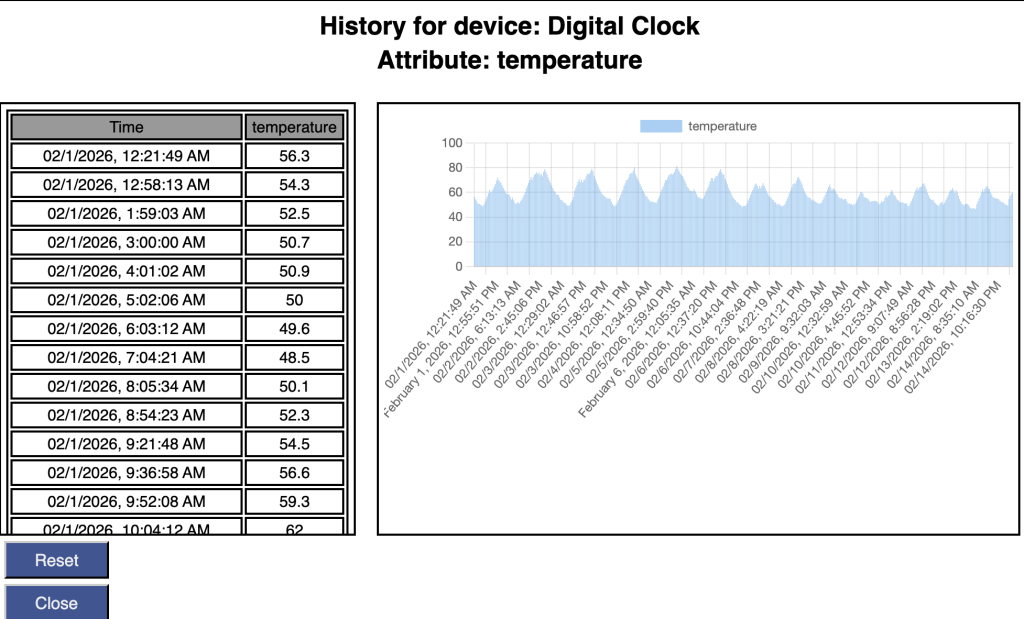
The table on the left will have a scrollbar as needed to accommodate long lists as needed.
RULE
Rule custom fields are used to invoke the built-in rule engine in HousePanel. This feature is a nice complement to the rule engine built into the Hubitat hub. It is provided for users who need simple rules and don’t want to fuss with the Hubitat web interface. It is also useful for implementing rules that trigger on one hub and invoke an action on a different hub. For exanple, I use it to trigger an ISY switch based on the state of a door sensor on my Hubitat hub. There is no other way to do this logic other than using the rule engine built into HousePanel. Full instructions and examples for HousePanel’s RULE engine are given in the section dedicated to RULEs.