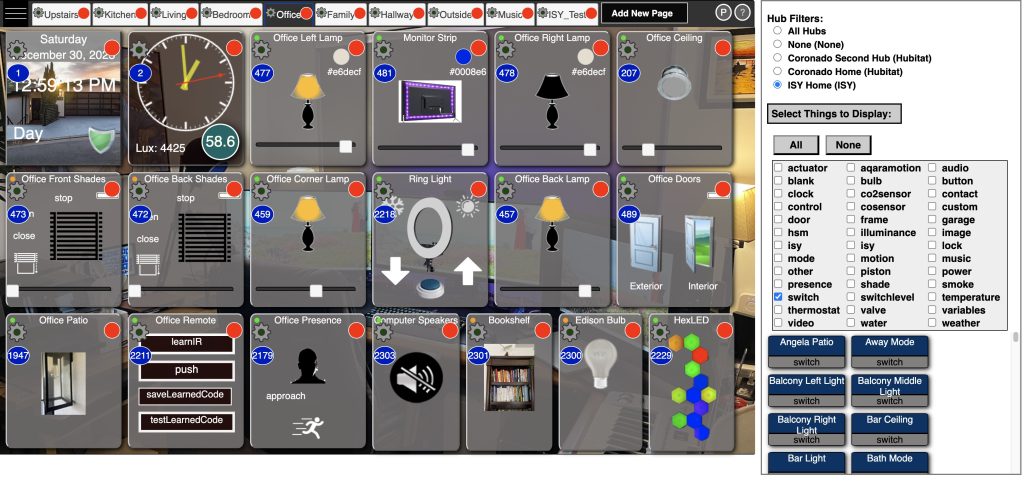
This page describes main HousePanel operation features, including how to activate tiles and adjust what displays on each page. Most of it will be obvious and intuitive, but a few hidden gems require explanation. HousePanel screen should look something like this by default:
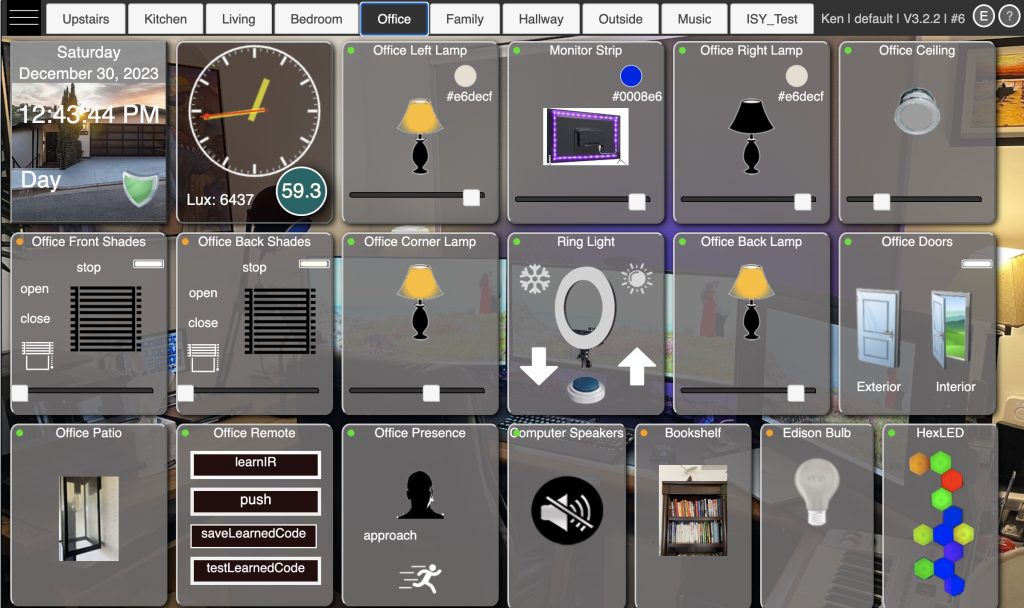
For starters, you can browse different rooms by clicking on any tab at the top of the page. Notice that the room display changes INSTANTLY! This is because HousePanel renders all pages in advance and organizes them into tabs. When you select a different tab you are just telling HP to show that tab that was previously created.
HousePanel Operation Click Actions
Most actions taken during HousePanel operation involve clicking on things. While on any page, you can click or tap on certain fields of a tile to change its state. For example, clicking on the light bulb in the “Office Back Lamp” tile will turn the light off if it is on, and will turn it on if it is off. If you click on a closed garage door, it will open. On dimmer tiles you change the intensity of the light by moving the slider. When you do this the light will turn on if it is off. Bulb type lights, like Office Left Lamp above, have a little round circle showing the current color setting. Clicking on this circle will open a color palette where you can select the color. To close the palette, click anywhere other than inside the palette.
If the item you click on has no action associated with it, the status of the tile will be displayed. Contacts, motion sensors, clocks, and blanks are examples of display-only tiles so clicking on them will cause no action. However, some display-only tiles report details when they are clicked. For example, clicking on the “Office Doors” tile will display a small window telling the user the state of the door, including all attributes. The “Office Doors” tile also shows off an advanced tile linking feature, whereby the status of an item on one tile can be linked to show on any other tile. This is explained in more detail in the linking section later.
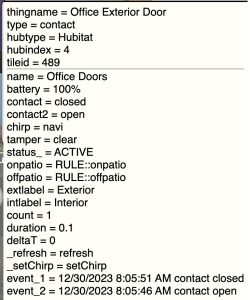
Status windows like the one shown here will be displayed whenever something is clicked on that doesn’t invoke an action.. If you are using a computer, the cursor will change to a pointer when you hover over things that can be clicked to change state.
Some tiles such as thermostat and music tiles have multiple controls that can be individually controlled by clicking on them. For example, each thermostat has a heater and an AC control and each one has up and down arrows that can be clicked to adjust the temperature setting. On music tiles, play, pause, skip, and stop can also be clicked on.
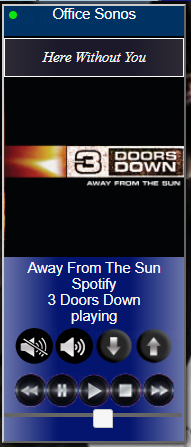
Music tiles have a special feature that retrieve the album art for most sources. This works for Hubitat music tiles and for Sonos native devices. The tile to the right shows what this looks like for a song played by 3 Doors Down.
If you have the browser control panel open (F12 on Chrome), clicking on things will return status information to that screen. This is a great way to see if your panel is working properly.
Moving Tiles Around in HousePanel
One of the most exciting features of HousePanel is the ability to highly customize its look and feel. The first level of customization involves simply moving existing tiles around on a page. To do this, you need to enter edit mode using the Edit menu option or pressing the “E” key. You can also click the circled “E” in the upper right corner. When you are in this mode, tiles can be moved around freely on the page by clicking and dragging them with your mouse. Editing is disabled for tablets, so you must use a desktop browser and a mouse to do editing. Once a tile is moved, it changes from “fixed” mode to “absolute” mode. When in absolute mode it will be excluded from tile reordering explained later. All tiles in fixed mode will be shown next to each other in their defined order. Tiles in absolute mode will be shown wherever they are dragged to. If you want to return a tile in absolute mode back to fixed mode, drag it to the top of the page with the top border slight overlapping the title bar and release it. It will snap back into the order that it had previously. To return all tiles select the “rehome tiLes” menu option or press the “L” key. This is handy for situations when a tile has been accidentally moved and is covered by other fixed tiles.
HousePanel Operation Edit Mode
Edit mode will look something like this:
The gear icons is used to activate the Tile Editor. The red dots are clicked on to delete a tile or a page. Similar gear icons and red dots are shown on each tile for entering edit mode or to delete that tile. If you select a red dot to delete a tile or page, you will be prompted to confirm. Upon confirmation the tile will be removed from the room. Clicking on the blue circle will launch the Tile Customizer. Tile Editor and Tile Customizer are documented in later sections. When in edit mode you can also add pages and add tiles using drag and drop from the library shown on the right. To exit edit mode, press the “P” key or click on the circled P in the upper right corner.
Changing Order in HousePanel Operation
To reorder tiles or rooms, enter Reorder mode by selecting “Reorder” from the main menu, or press the “R” key. The main difference of this mode is things are automatically snapped into place in this mode based on the order. Reorder mode only applies to tiles that are in “fixed” mode – that is, if a tile has been moved in edit mode it will be in “absolute” mode and will not be impacted by the reorder command.
Reorder mode also allows room tabs to be moved to a different order. To do this, simply click and hold a tab and move it left or right to reorder your rooms. The new room location will be permanent on this server. Once a tile is manually moved to a random location it will no longer be available to the reorder command.To exit reorder mode, press the “P” key or click on the circled P in the upper right corner.
Adding or Removing Multiple Things in HousePanel
Deeper customization involves adding or removing things to your rooms. One way to do this is to use Edit mode described above. While in Edit mode a catalog will display on the right hand side. You can drag things from this catalog and drop them on the page. A confirmation box will appear – click on Yes to confirm addition of the dropped tile.
An easy way to make multiple changes to multiple rooms at the same time during HousePanel operation is to use the Options page. This page is launched using the Options button found at the bottom left of the page. Clicking this button will load a page with a two-dimensional matrix of all your things and all your rooms that looks like this:
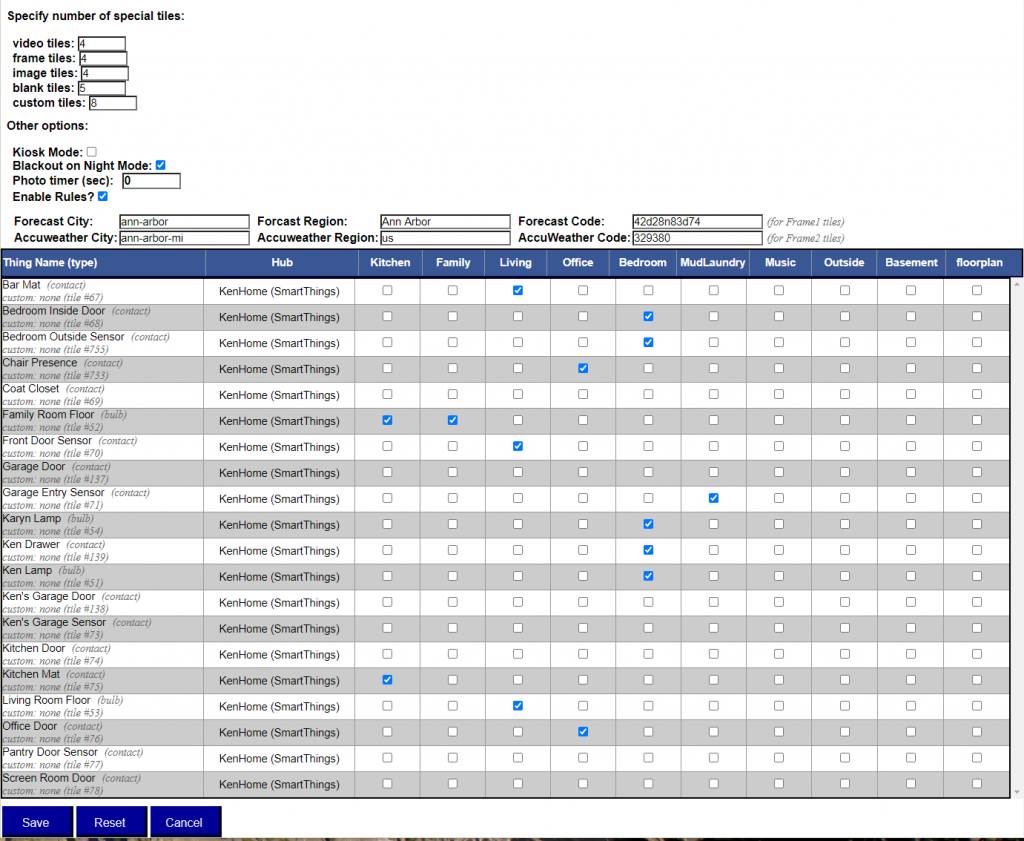
Everywhere you see a check mark means the thing of that “row” will be shown in the room of that “column”. If you have a large number of things you can filter showing things by type by clicking on the check boxes on the top of this page. You can add or remove a check mark in any room for any thing. Duplicates are allowed. For example, at one extreme, if you want all things to show in all rooms, you would just check all of the boxes. This wouldn:-:t make any sense but hopefully this extreme example indicates the tool:-:s extreme flexibility. A more realistic example might be to check a thing with a name that didn:-:t match one of the default keywords, or to uncheck a thing that matched that you don:-:t want shown in the default room. For example, in my installation I added a check to “Back Yard Rock” to the Outside room, and removed the “Garage Entry Door” from the Outside room. I also checked the clock row for every room so I have a clock on all pages. You should also notice that the hub number and type of each thing is shown in this table.