HousePanel(TM) for Smart Homes
by Ken Washington LLC
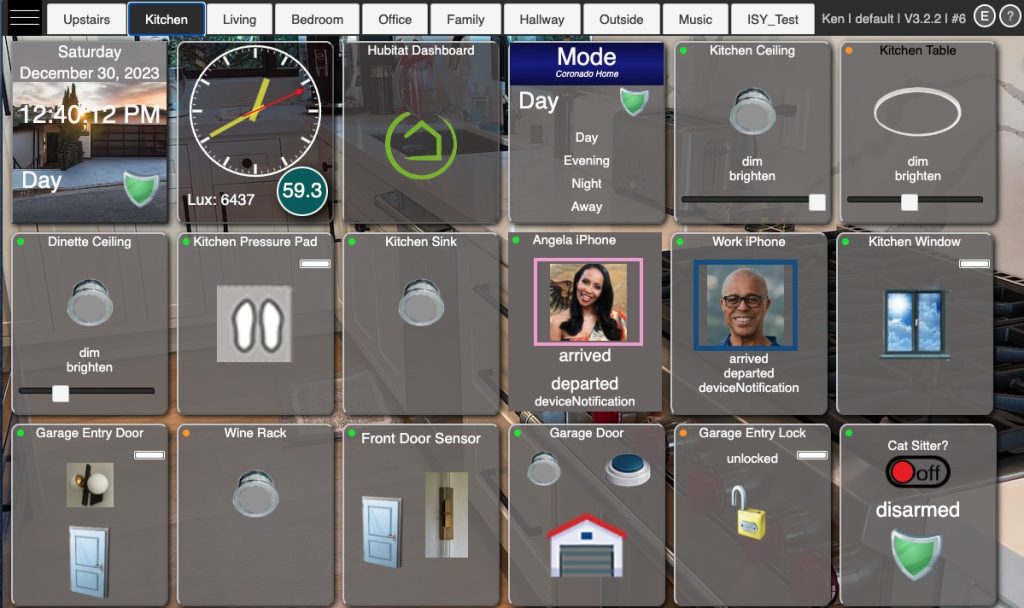
HousePanel is a highly customizable dashboard for accessing and controlling a Hubitat or ISY powered smart home from a Tablet, Computer, or even Smart Phone. HousePanel has been developed and fine tuned for nearly a decade using industry standard web tools such as Node.js and SQLite3 for fast performance and reliability. HousePanel gives users full control over the look and feel of their dashboard. Once installed, HousePanel is accessed using any web browser that supports Javascript. The main page of HousePanel once installed and configured will look something like this:
Once set up, users can customize their dashboard using the built-in full-featured Tile Editor and Tile Customizer. These tools provide intuitive ways to modify the look and feel of the main page and any tile on the pages. HousePanel also supports multiple user configurations. Multiple user accounts can be created, each with their own username and password.
Installation
Full instructions to install HousePanel are provided on the Installation Page. Power users can get started quickly by following these easy-start instructions. Installation includes two parts. The first step is to set up the server on an always-on device. A good choice is a Raspberry Pi but any Linux machine, BSD Unix, Mac, or PC on your local network that is always powered on will work fine. Make sure you have npm and Node installed on the server, then clone the repo at https://github.com/kewashi/HousePanel.git, followed by the usual “npm install”. Then run the server hpserver.js in the background.
The second step for Hubitat hub users is to set up the HousePanel groovy app on your Hubitat hub. ISY users do not need to do this step. Search for “housepanel” in the Hubitat Package Manager for easy installation. Select your devices and options and save the app. Then launch your browser and point it to the server you installed above and the selected port. If you follow this order, your hub settings will be auto populated from the groovy side. If you are an ISY hub user the hub information will need to be manually provided.
If this doesn’t make sense to you, follow the more detailed step-by-step instructions here.
Hub Support
HousePanel supports Hubitat hubs and ISY hubs – both Polisy and EISY hubs. HousePanel also provides back-end support for the Hubitat Node Server (HNS) used to port Hubitat devices into the ISY environment. If you have an ISY Polisy or EISY server box, then you will want to use HNS to bring your devices into the ISY system. From there you can add them to HousePanel. Doing this will make your devices show on your HousePanel dashboard as well as in the UD Mobile app and the IoX admin console. If you are not an ISY hub owner, you can simply ignore all ISY references.
HP runs on a customer-provided server and does not expose your personal data nor any details about your environment to the developer or any other party. You are in total control. If you are an ISY hub user, the same hub that powers your devices – either a Polisy or an EISY box – can be used to host the HousePanel server. For Hubitat hub users, the HousePanel.groovy file must be installed as a user “app”. The installation section describes how to do this in more detail.
Device Types
If you link a Hubitat hub then devices will report their type to HousePanel. ISY devices brought in using the Hubitat Node Server (HNS) will also report their device types. In fact, any ISY device that follows the ISY Hint guidelines will report their types correctly. If a Hint is not provided or not recognized, the device type will be “isy”. HP support the following types with the noted ISY Hint mappings. “n” means integers, “f” means float, #hex means a hex value, and (x,y,…) means supports the states listed in parentheses. In most cases the states are also supported commands.
| Type Label | Typical Use | Supported Attributes and Commands |
ISY Hint |
| switch | Light switches and plugs | switch(on, off), on, off | 1.1.0.0 4.16.0.0 |
| switchlevel | Light dimmers | switch(on, off), level(%), on, off, dim, brighten |
1.2.0.0 |
| bulb | Color light bulbs (Hue) | switch(on, off), level(%) hue(n), saturation(%) color(#hex), on, off, dim, brighten |
1.3.0.0 |
| button | Push buttons | pushed(n), held(n), doubleTapped(n), push, hold, doubleTap |
1.4.0.0 |
| power | Plugs with power meters | On, Off, power(f), energy(f) voltage(f), current(f) |
1.5.0.0 |
| water | Leak sensors | water(wet, dry), wet, dry | 1.6.0.0 |
| contact | Door and window sensors | contact(open, close) | 7.1.0.0 |
| motion | Motion sensors | motion(active, inactive) | 7.2.0.0 |
| presence | Phone presence | presence(present, absent) | 7.3.0.0 |
| cosensor | Carbon monoxide detectors |
carbonMonoxide(clear, detected, tested), clear, detected, test |
7.4.0.0 |
| co2sensor | Carbon dioxide sensors | carbonDioxide(f) | 7.5.0.0 |
| smoke | Smoke detectors | smoke(clear, detected, tested), clear, detected, test |
7.6.0.0 |
| door | Doors and gates | door(open, closed, opening, closing), open, close |
2.1.0.0 |
| garage | Garage doors | garage(open, closed, opening, closing, unknown), open, close |
2.2.0.0 |
| shade | Window shades | windowShade(open, closed, opening, closing, partially open), open, close, raise, lower |
2.3.0.0 |
| valve | Sprinklers and valves | valve(open, closed), open, close | 2.4.0.0 |
| lock | Deadbolt locks | lock(unlocked, locked, unknown, jammed), battery(%), lock, unlock |
8.1.0.0 |
| mode | Home mode | themode(Day, Evening, Night, Away), day, evening, night, away |
8.2.0.0 |
| hsm | Hubitat Security Mode | status(disarmed, armedAway, armedHome, armedNight, armingAway, armingHome, armingNight, allDisarmed, Not Installed), armAway, armHome, armNight, disarm, disarmAll, cancelAlerts |
8.3.0.0 |
| thermostat | Thermostat (Nest & Ecobee tested) |
temperature(f), humidity(%), switch(on,off), heatingSetpoint(f), coolingSetpoint(f), thermostatMode(heat, cool, auto, off), thermostatOperatingState(heating, cooling, idle), thermostatFanMode(auto, on), on, off |
5.1.0.0 |
| temperature | Temperature sensors | temperature(f), humidity(%) | 5.2.0.0 |
| illuminance | Lux measurement | illuminance(n) | 5.3.0.0 |
| other | Any sensor | all supported states | 9.1.0.0 |
| actuator | Any actuator | all supported states, all supported commands |
9.2.0.0 |
HousePanel Common Attributes
All devices from hubs have a name attribute that is displayed at the top of the tile. All devices also have a status_ attribute that reports whether the device is in an ACTIVE, INACTIVE, or UNKNOWN state. The HousePanel GUI shows this as a small dot in the upper left corner of each displayed tile, which will be either red, yellow, or green. Some devices also report a battery state that HousePanel uses to display a battery icon showing the state of charge for the device. ISY hubs use special attribute names that are mapped to the above Hubitat attributes. This mapping is all done behind the scenes by means of an additional mapping in HNS that translates these internal codes into English equivalents on IoX devices.
Hubless and Special Tiles
Even if no hub is connected, the following tiles are supported:
| Type | Typical Use | Supported Attributes | Special Instructions |
| clockdigital | Digital Clock | time, date, weekday, tzone, fmt_date, fmt_time |
Set fmt_date and fmt_time attributes in the customizer to change the formats |
| clockanalog | Analog Clock | skin, time, date, weekday, tzone, fmt_date, fmt_time, |
The “skin” field displays as an analog clock using a CoolClock widget. Other fields can be unhidden to create a mixed clock style. The “skin” field can be changed in the Customizer to alter the style of the analog clock |
| weather | Weather | temperature, feelslike, humidity (and more depending on which weather service) | The Options page is where you specify weather service parameters. HousePanel supports Open Meteo, TomorrowIO, WeatherWidget.io, Ambient Weather, and AccuWeather |
| image | Images | image, url, width, height | Use to show any image that you upload or point to on the web by setting the url field to the URL of the image. Define this on the Options page |
| frame | Frames | frame, url, width, height | Use to embed content from other websites in an iFrame tag. Most commonly used to display weather tiles. Define this on the Options page. |
| video | Videos | video, url, width, height | Use to embed videos available on the web. Set the url field to the URL of the video. Define this on the Options page. |
| custom | Custom content | custom, width, height | Ad hoc content display. Typically used to mix other tile content onto a single tile using the powerful Tile Customizer |
| controller | Controller | menu items | This tile replicates the functionality of the menu by showing all available commands. This is useful if you set Kiosk mode since commands will still be available on this tile when the menu is not displayed in kiosk mode. |
| blank | Spacers | width, height | Has no content and are styled to be invisible. These were added before tiles could be resized and moved around freely, so they now have limited to no use. |
Analog and digital clock tiles are updated every second to support displaying the second digit for digital clocks. The format of the clock tile can also be completely changed using the Tile Customizer as explained later.
Content for the image and video tiles are provided on the Options page, where users can upload an image or point to an existing image on the web. If users know the name of an image in the Icon or Media folders they can also specify that name; however, it will be much easier to use the Tile Editor and set the whole tile background to any image in the Icon or Media folder. The size of the image can be adjusted using the “width” and “height” parameters on the Options page, or they can be overridden by the Tile Customizer.
Frames are good to use to display weather information obtained from web services such as Accuweather. HousePanel will actually create the content of the first two frames “Frame1” and “Frame2” if regional information is provided on the Options page. Frames 3 and beyond can be used to display any content on the Internet. The Options page can be used to paste any web widget into any Framex.html file where “x” is the frame number.