
Options
The Options page is where you select various options for how HousePanel performs. This is where you provide API keys for weather tiles and where you define whether or not to blank out the panel at night, or whether or not to use the optional photo viewer when the dashboard blanks out. This is also where you can change how many special tiles of each type your dashboard will support. Finally, the Options page is where you provide user-defined content for the Frame, Image, and Video special tiles. The top half of the Options page looks as follows. 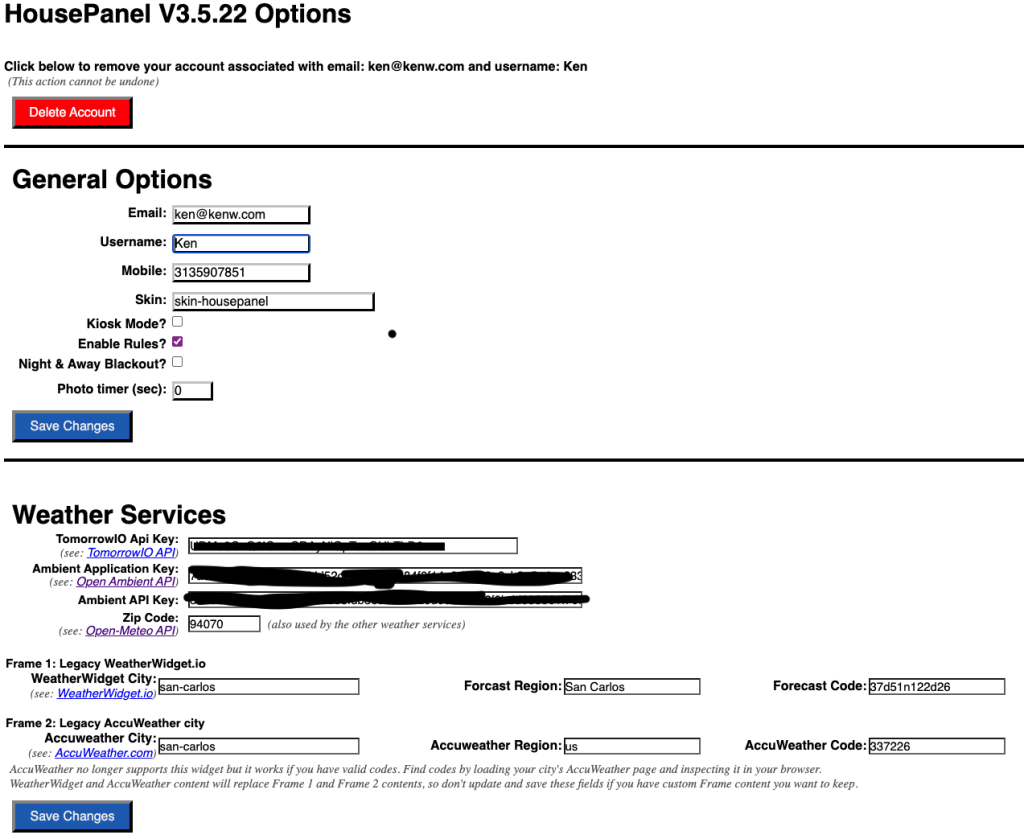
General Options
These settings are mostly self explanatory. For changes to take effect, you must press the “Save Changes” button in each section. The changes will be reflected on your dashboard once you return to the main view. The red Delete Account button is used to remove your account. Note that this cannot be undone, so once you remove an account you will need to register that user again for them to use the dashboard. The Mobile number requires special mention. This number is not actually used to call or txt you. This is a second layer of security protection, so you can provide any sequence of digits here (6 or more), but whatever sequence you provide must be used when you log into the dashboard. The Email is your definitive login identifier.
Skin
The Skin is the name of the folder where you have your default icons and media files. By default this is “skin-housepanel” but you can make as many folders as you like and switch between them here. The appearance of your dashboard is governed by the settings in “tileeditor.css” followed by the “housepanel.css” file in this folder, and then followed by user customizations made in the Tile Editor that are stored in userx/default/customtiles.css”. The default “skin-housepanel” skin is designed to not look and feel “geeky”, with large beautiful tiles placed on beautiful full backgrounds. There are also “skin-modern” and “skin-legacyblue” skins that provide a different look and feel. You can edit each skin to your liking or use the Tile Editor to customize your selected skin. Customizations will apply to all skins so the best way to customize things is to set icons in your skins and to customize colors, sizing, and placement of things using the Tile Editor. I personally don’t use alternate skins and I use the Tile Editor to set icons as well as the other style settings. You can choose whichever approach you prefer.
Kiosk Mode
When this box is checked, the GUI will not allow users to enter the Tile Editor or the Tile Customizer, or any of the menu functions. The dashboard can only be used to control devices in the home and observe their state. The system administrator can always change this by using a computer and loading the page http://192.168.x.y:port/showoptions, where x, y, and port are specific to your installation. This will bring you back to this page when in Kiosk mode where you can disable it temporarily.
Enable Rules
Unchecking this box will disable the Rule Engine so that all defined rules provided will be ignored.
Night and Away Blackout and Photo timer
This setting will cause the panel to turn into a fully blank screen with a black background when the home is in night or away mode. If the Photo timer is set to a non-zero value, the photos stored in the userx/default/photos folder will be displayed in rotational order every “n” seconds.
Weather Services
HousePanel includes native integration with three open source weather services: TomorrowIO, Ambient Weather, and Open Meteo. To use the first two you must provide valid API keys. To use Open Meteo you only need to provide your local ZipCode. The ZipCode is also required when using TomorrowIO.
Frame 1
This is a holdover legacy feature that allows you to provide your city information for the WeatherWidget.io service and then HousePanel will automatically write the contents of the Frame1.html file for you. In the current and future versions of HousePanel, it is far easier to use the following sections to paste your weather widget directly into the Frame1 input box. This is done by navigating to the WeatherWidget.io weather service, or any other weather service of your choice, and copying the widget’s content into the clipboard.
Frame 2
This is similar to Frame 1 but is specific for AccuWeather legacy widgets. AccuWeather no longer supports this widget, but the widget will still work if you can find the city codes for your area. The best way to do this is to load any AccuWeather page and then inspect it and search for the codes in your browser’s inspection window. Again, it is simpler to use the Frame copy/paste method described below if you have access to modern supported weather widgets. I also find that the Open Meteo weather service provides a very nice weather tile and it only requires a zipcode.
Special Tiles
This section is where you specify how many special tiles you want of each type. The page must reload after changing these values. You can have as many as you like, including clocks. One reason you might want more than one clock is to style each clock for a different time zone by setting their timezone offsets to different values in the Tile Customizer.
Frame Contents
Frames are stored on your server as Framex.html, where x is the frame number. This section is where you can paste the contents you want to save in these files. You first give the frame number and then paste the content, and then select “Save Frame”. A preview of the contents will be shown below the text that you pasted. Note that the contents will show here exactly as it will show on your dashboard, so check it here for correctness.
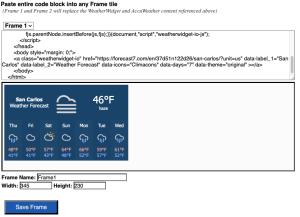
Image and Video Contents
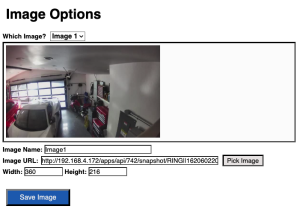 The last two sections allow you to upload your own images or videos, or point to images or videos on the web for inclusion in the “image” and “video” special tiles, respectively. You can set the width and height values here as well as give the tile a name to replace the provided default. Anything you provide here can be overriden by values given in the Tile Customizer. Previous versions of HousePanel required the use of Tile Customizer to set the width, height, and url of images and videos. This is no longer the case, but if you do have those set, they will override anything you provide here in the Options page. As a result, if you migrated from an older version of HousePanel, you might want to do into the Customizer and remove any user values provided there.
The input section for images is shown on the right. The video input section looks identical. When you select an image on your local disk, it will be uploaded to the “media” folder and the url field will be updated to point to it. Alternatively, you can specify the url of any image that exists on your local network or the Internet. The example shown here points to Ring Cam generated images stored on my LAN.